How to make a link-in-bio page on your phone
Pick one useful destination for your profile link, make the first action obvious, and test the page on a phone before publishing. Here is a practical walkthrough in shapes, from the starting look to the final checks.
A shapes guide, not an independent product review. Examples are illustrative; screenshots show the real application.
Decide what your page needs to do.
Before opening a builder, write down the one thing you want a visitor to do next. Listen to a release? Book an appointment? Browse a new collection? That choice should decide what appears first.
Collect the destination URLs and one or two images you own or have permission to use. A useful first page can be a name, a short description, one featured action, and a few supporting links. You do not need every social account you have ever opened.
- Use your current work, not an expired offer, as the main action.
- Choose a label that explains the destination: “Book a consultation,” not “Click here.”
- Keep any payment, booking, or email service account you already need. A bio page is a front door, not automatically a replacement for those services.
Choose a look before creating the account.
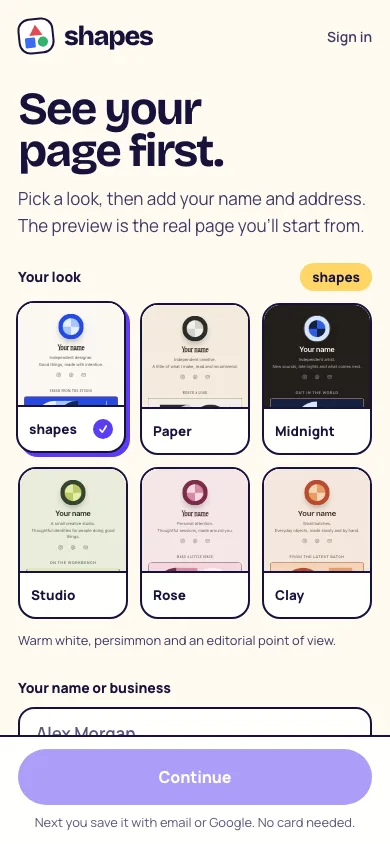
Open Create your page in shapes. Pick one of the six starting looks, then enter Your name or business and Your page address. The preview shows the real example page with your name and chosen look. Availability is checked, but an address is not claimed just because it appears available.
Continue to save the page with email or Google. After sign-in, the saved look and details carry into a private draft. The sample artwork and content are starting material; replace them with your own before sharing the page. No card is needed to start building.
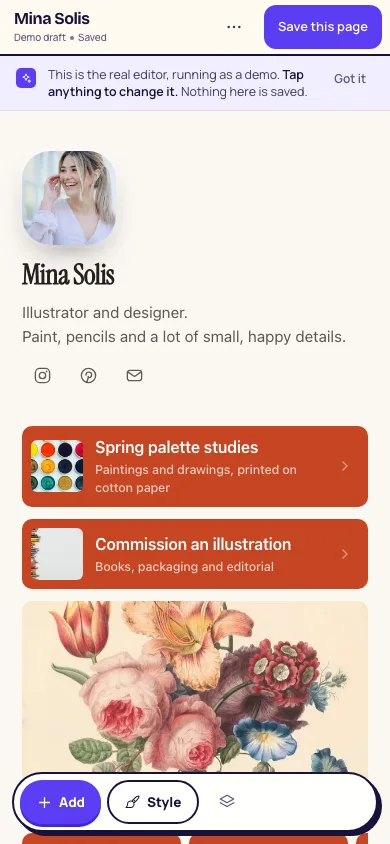
Edit the page, not a separate document.
The page itself is the workspace. Tap a block to select it. Tap again to edit supported words in place, or use Edit to open the block’s controls. Add inserts another block; Style changes the look. You can use tap controls to reorder content—dragging is optional.
Replace the profile name, bio, links, and sample images. A short bio should tell a new visitor what you do and why the next action matters. Check the exact destination URL whenever you change a link label.
Cove is an optional second way to edit. You can ask it to organize or restyle a draft and undo its changes. It cannot upload your files, connect service accounts, take payments, or publish the page. Review the result yourself.
Make a short path through a long list.
Keep the main action visible and put related supporting links together. For example, a musician might feature the new single, then group tour dates and older releases. A maker might put the current collection before a folder of past work.
shapes folders can hold related blocks. Tabs organize folders, not arbitrary loose blocks. Use these tools when they reduce scanning, not because every page needs more navigation. If a page has only three useful links, a simple list may be clearer.
Check the preview. Then choose to publish.
Autosaving a draft does not update the published page. Publishing is a separate action that puts the draft online. shapes lets you build and preview for free; a subscription is required to publish. Check current pricing for plan limits and custom domains.
Before publishing, open your destinations and test their real behavior on a phone. Supported embeds may open an external service, and checkout depends on the provider. shapes does not process orders or payments.
After publishing, put the public page address in your profile’s website field and open it as a visitor. When you make a later edit, review the new draft and publish again when the changes are ready.
- Replace all example names, images, and destination links.
- Read the page at normal phone size and check text contrast.
- Test the main action, booking links, checkout destinations, and any signup form.
- Check that your public address is correct before updating your social profile.
- Revisit links when an event, release, or offer ends.